PHOTOSHOP 101 // HOW I EDIT MY IMAGES
I get asked quite often how I edit my images. To start, I edit them myself, and try to keep each image as natural as possible. Thankfully, I will typically shoot in favorable lighting conditions. so I am able to keep the editing to a minimal. With Atlantic-Pacific being so heavily focused on fashion, I want the colors of the photos to be as natural as possible so I can accurately represent the colors, prints, and patterns of the clothing that I am wearing! I’ve found images that are too warm or too grainy simply don’t accurately portray the clothing and accessories that well, and at the end of the day, that’s what I am here for! I always edit in Photoshop, and below I am sharing just a few of the techniques and tools I use most!
SPOT HEALING BRUSH // I am shooting a lot in cities, which can be challenging when it comes to people in the background, trash on the street, and general clutter in the frame! I use the spot healing brush to clean up a lot of that mess and occasionally to smooth out a wrinkle or even erase a stain on my clothing (I am messy). Again, I try not to change anything to the point of it being unrealistic – I don’t alter my own body or drastically alter environments – but I will erase gum on the sidewalk, spray paint on buildings, and anything else that may distract from the photo!
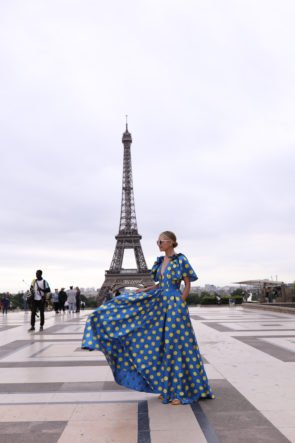
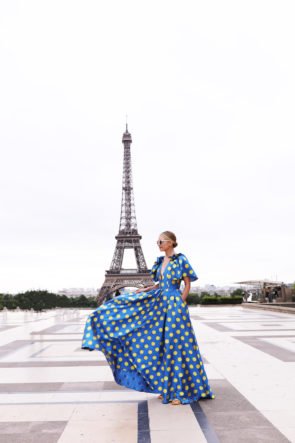
In Photoshop the brush is super simple to use and is a tool shortcut on the side bar. You can change the size and hardness of the application depending on how big or small of an area you are editing. Photoshop does ‘guess’ as to what you want to replace the space as, but nine times out of ten, it works just fine. You can also use the clone stamp tool to achieve some of the same results, but I have found the spot healing brush to be a bit easier to use. Once you choose the size and hardness, simply draw over the area in the background layer. You can see in the below shot how I removed a lot of the people in the background (this is probably the largest crowd I have ever edited). I will note that I try to shoot at dawn, and therefore most of my original photos do not have people in the background, but in famous locations such as the below, it is simply unavoidable. This shot was taken at 6:15 am and there was still a small crowd!
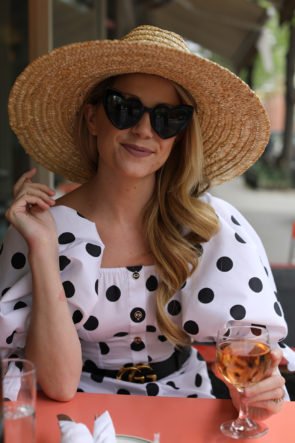
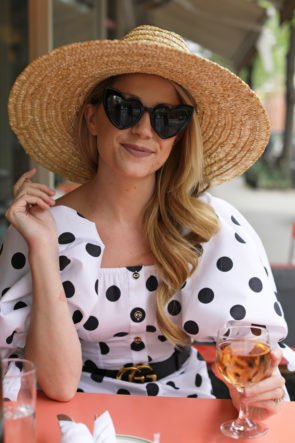
BRIGHTENING AN IMAGE // While I always try to shoot in ideal lighting, it doesn’t always work out that way as things can change quite unexpectedly. When the lighting in an image isn’t ideal, I typically start in the background layer and alter the levels of shadows and highlights (IMAGE > ADJUSTMENTS > SHADOWS/HIGHLIGHTS). Next, I add a layer and alter the amount of brightness and contrast (LAYER > NEW ADJUSTMENT LAYER > BRIGHTNESS/CONTRAST). If I have to choose, I typically shoot on the darker side versus the lighter side. I have found it to be easier to brighten an image in post production versus attempting to darken one. If you shoot an image that is over exposed or blown out, it is almost impossible to pull out the details in post production. See below for a typical example of slightly decreasing the shadows and increasing the brightness! P.S. – big hats produce lots of shadows!
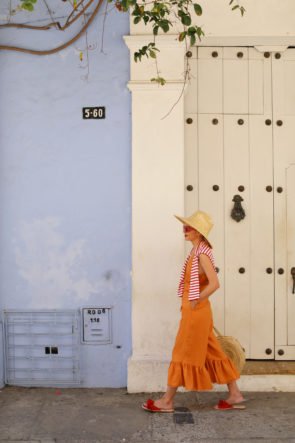
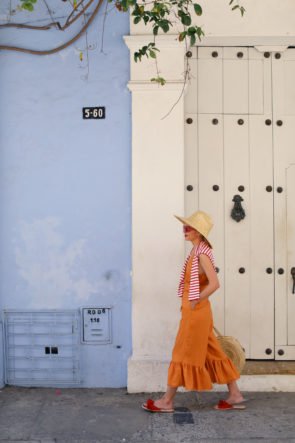
COLOR BALANCE // It is quite hard to tell when you are shooting whether the tone of the image will be too blue, too yellow, too red, etc. Many times once I have uploaded an image, I will notice the color tones to be slightly off and I’ll need to alter them just a bit in Photoshop. This happens a lot in more cozy environments like the West Village in NYC. The sun might shift and bounce off a neighboring red brick wall, and BAM, all of your images now have a reddish tint. The winter can also be a challenge, as photos will tend look drab and on the blue-ish side, so I’ll add more yellow on the blue/yellow scale. Little adjustments can make a world of difference. I use color balance to correct all of this (LAYER > NEW ADJUSTMENT LAYER > COLOR BALANCE). The below shot was taken in Cartagena! The trim and door on this house are white, but there was a yellow wall across the street that reflected and caused it to appear more yellow, so I just brought bumped up the blue scale!
ADDITIONAL Q&A:
Q: What editing tools or apps do you use for on the fly editing?
A: Most of the photos I post, even on Instagram, are shot on my DSLR and edited in Photoshop. However, there are times when I need to edit a photo on my phone and for that I will use Facetune. Many people associate Facetune with, well, editing your face, but I use the patch feature to edit out gum on the sidewalk and other distracting elements. If I am ever looking to edit lighting, color, etc. I will simply edit within the photo features on my iPhone.
Q: Do you use any Lightroom presets? I feel like those are all the rage these days!
A: I do not use Lightroom or any presets, but I know many bloggers and photographers who swear by them! I think they are especially great if you have a very specific ‘look’ to your photos, such as a grainy, more vintage tint, or images that are all very warm, as they will allow you to achieve that same look again and again! As I mentioned, I prefer to keep my images looking as natural as possible.
Q: What camera and lenses do you use?
A: I currently use a Canon 5D Mark IV camera with 50mm f/1.2 and 35 mm f/1.4 lenses. I have always used Canon and have been very happy with the results. I typically only buy Canon lenses, but have used Sigma lenses in the past as well.
Q: What version of Photoshop do you use?
A: I use Photoshop CC! I have the monthly Adobe Creative Cloud subscription.
